> ## Documentation Index
> Fetch the complete documentation index at: https://docs.userplane.io/llms.txt
> Use this file to discover all available pages before exploring further.
# Chrome Extension Link Creation
> Create recording links from the Chrome extension using the side panel, keyboard shortcut, context menu, or omnibox
The Chrome extension supports multiple ways to create recording links. Every method opens the same Create Link form in the side panel and produces the same link.
## Create a recording link
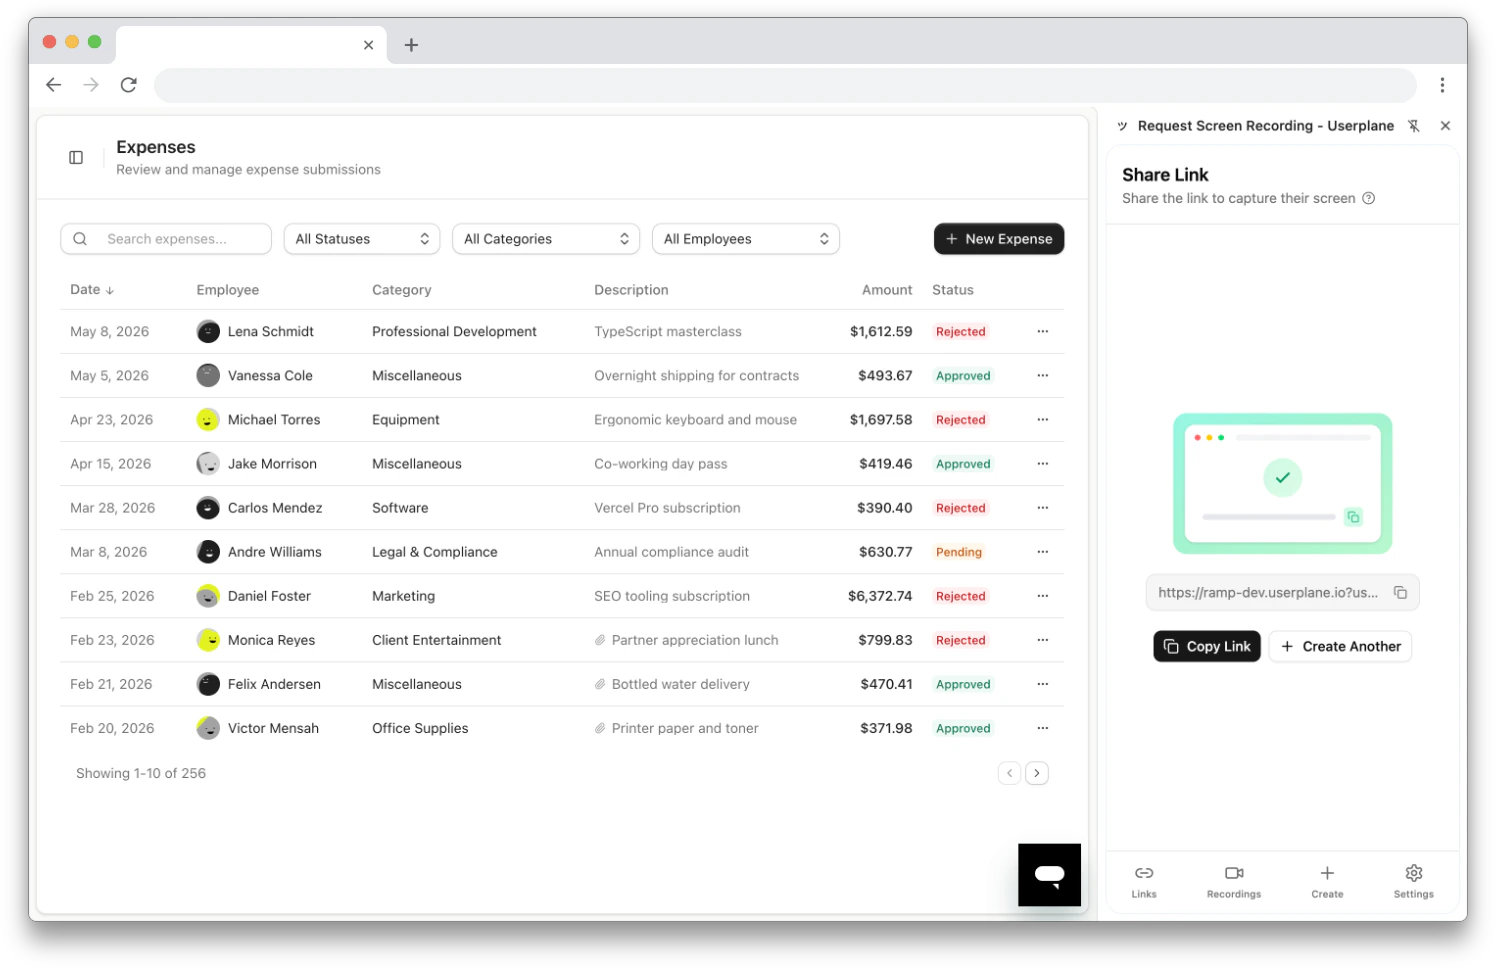
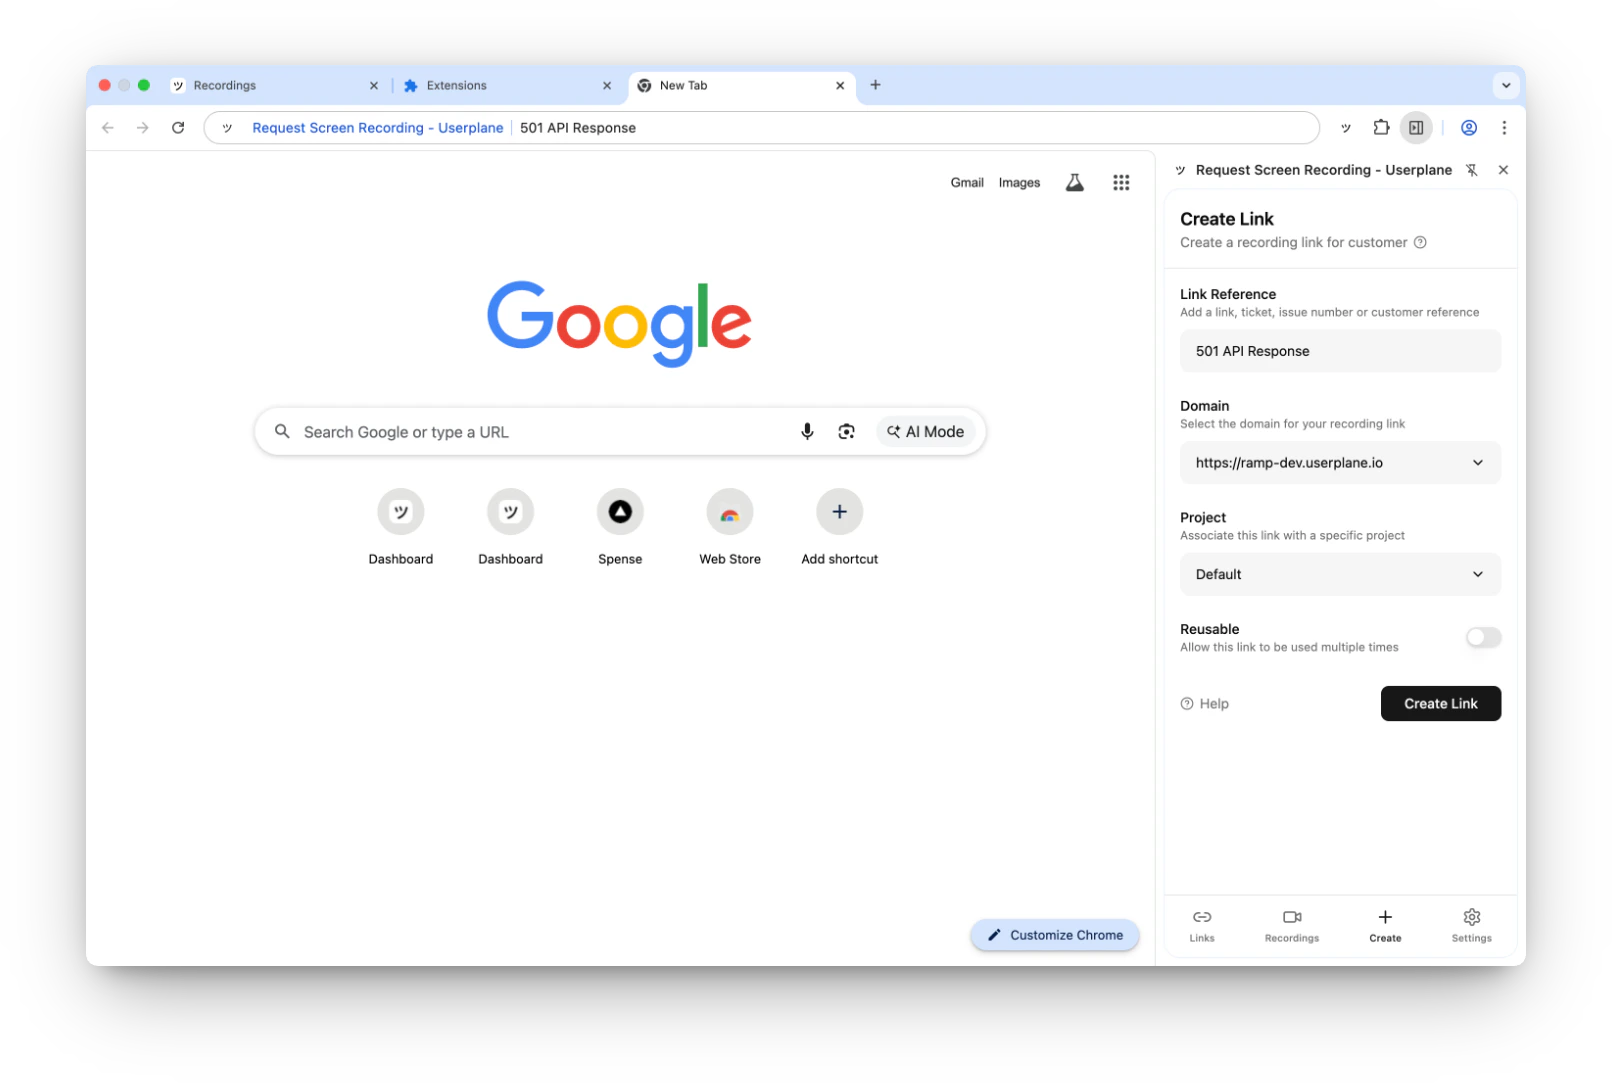
Click the **Userplane** icon in your Chrome toolbar. The side panel opens to the Links list.
Click the **Create** tab in the bottom navigation of the side panel.
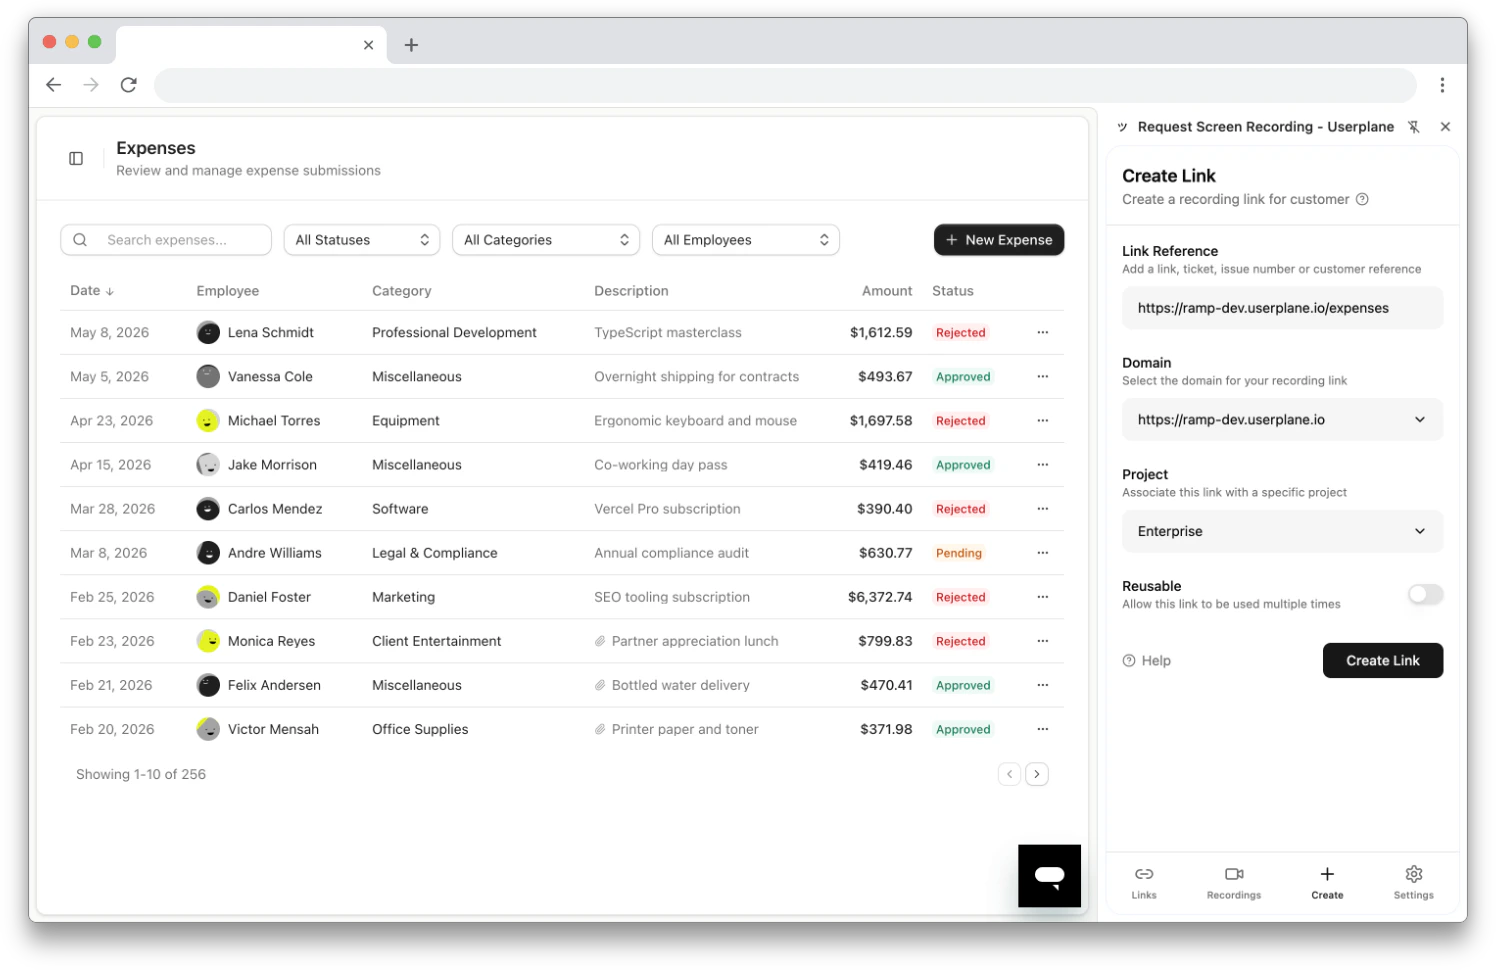
 * **Link Reference** (optional) — a URL, ticket number, or customer reference. Auto-populates with the current tab URL if [Prefill Reference](#prefill-reference) is enabled.
* **Domain** (required) — select from your workspace's domains. The first domain is auto-selected.
* **Project** (optional) — associate the link with a project for organization. The default project is auto-selected if one exists.
* **Reusable** — toggle whether the link can be used for multiple recordings or just one.
Click **Create Link**. If successful, the Share Link screen appears.
Click **Copy Link** to copy the URL to your clipboard, then paste it into your help desk reply, email, or chat.
* **Link Reference** (optional) — a URL, ticket number, or customer reference. Auto-populates with the current tab URL if [Prefill Reference](#prefill-reference) is enabled.
* **Domain** (required) — select from your workspace's domains. The first domain is auto-selected.
* **Project** (optional) — associate the link with a project for organization. The default project is auto-selected if one exists.
* **Reusable** — toggle whether the link can be used for multiple recordings or just one.
Click **Create Link**. If successful, the Share Link screen appears.
Click **Copy Link** to copy the URL to your clipboard, then paste it into your help desk reply, email, or chat.
 Press **Cmd+Shift+Y** (Mac) or **Ctrl+Shift+Y** (Windows/Linux) from any Chrome tab. The side panel opens directly to the Create Link form.
 * **Link Reference** — auto-populates with the current tab URL if [Prefill Reference](#prefill-reference) is enabled. Edit or clear it as needed.
* **Domain** (required) — select from your workspace's domains.
* **Project** (optional) — associate the link with a project.
* **Reusable** — toggle for single or multiple recordings.
Click **Create Link**. The Share Link screen appears.
Click **Copy Link** to copy the URL to your clipboard, then paste it into your help desk reply, email, or chat.
You can customize this shortcut at `chrome://extensions/shortcuts`. Find **Userplane** and
change the **Create Recording Link** binding to your preferred key combination.
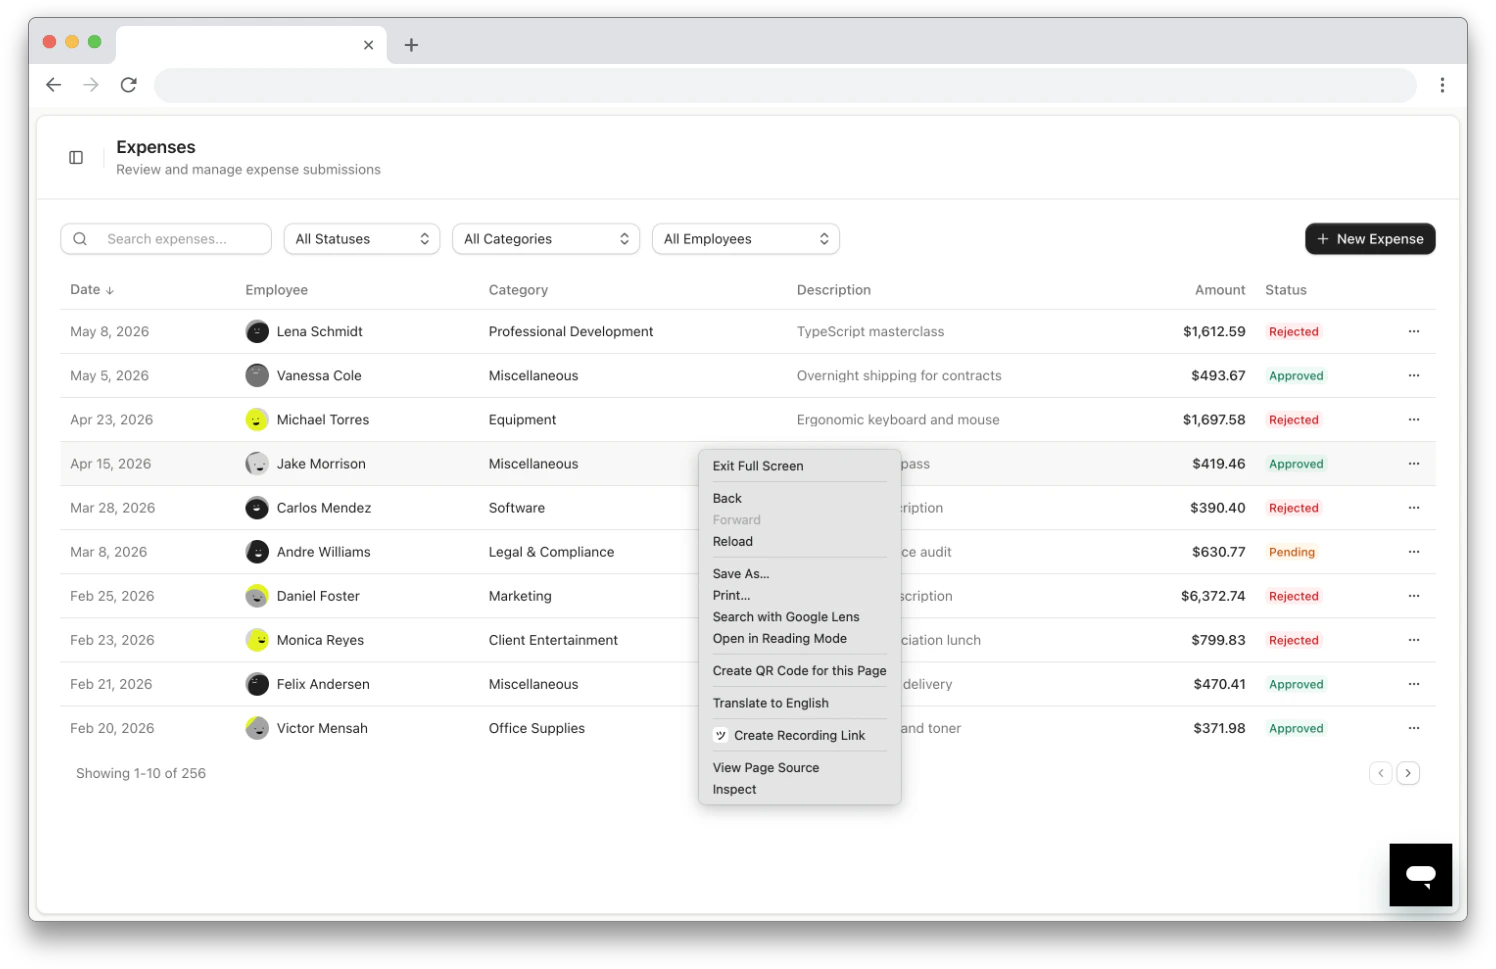
Right-click anywhere on a web page and select **Create Recording Link**. You can also right-click the **Userplane extension icon** in the toolbar and select **Create Recording Link**.
* **Link Reference** — auto-populates with the current tab URL if [Prefill Reference](#prefill-reference) is enabled. Edit or clear it as needed.
* **Domain** (required) — select from your workspace's domains.
* **Project** (optional) — associate the link with a project.
* **Reusable** — toggle for single or multiple recordings.
Click **Create Link**. The Share Link screen appears.
Click **Copy Link** to copy the URL to your clipboard, then paste it into your help desk reply, email, or chat.
You can customize this shortcut at `chrome://extensions/shortcuts`. Find **Userplane** and
change the **Create Recording Link** binding to your preferred key combination.
Right-click anywhere on a web page and select **Create Recording Link**. You can also right-click the **Userplane extension icon** in the toolbar and select **Create Recording Link**.
 The side panel opens to the Create Link form. If [Prefill Reference](#prefill-reference) is enabled, the **Link Reference** field auto-populates with the current page URL.
* **Domain** (required) — select from your workspace's domains.
* **Project** (optional) — associate the link with a project.
* **Reusable** — toggle for single or multiple recordings.
Click **Create Link**. The Share Link screen appears.
Click **Copy Link** to copy the URL to your clipboard, then paste it into your help desk reply, email, or chat.
Type **userplane** in the Chrome address bar, then press **Tab**. The address bar changes to show "Userplane - Create Recording Link".
The side panel opens to the Create Link form. If [Prefill Reference](#prefill-reference) is enabled, the **Link Reference** field auto-populates with the current page URL.
* **Domain** (required) — select from your workspace's domains.
* **Project** (optional) — associate the link with a project.
* **Reusable** — toggle for single or multiple recordings.
Click **Create Link**. The Share Link screen appears.
Click **Copy Link** to copy the URL to your clipboard, then paste it into your help desk reply, email, or chat.
Type **userplane** in the Chrome address bar, then press **Tab**. The address bar changes to show "Userplane - Create Recording Link".
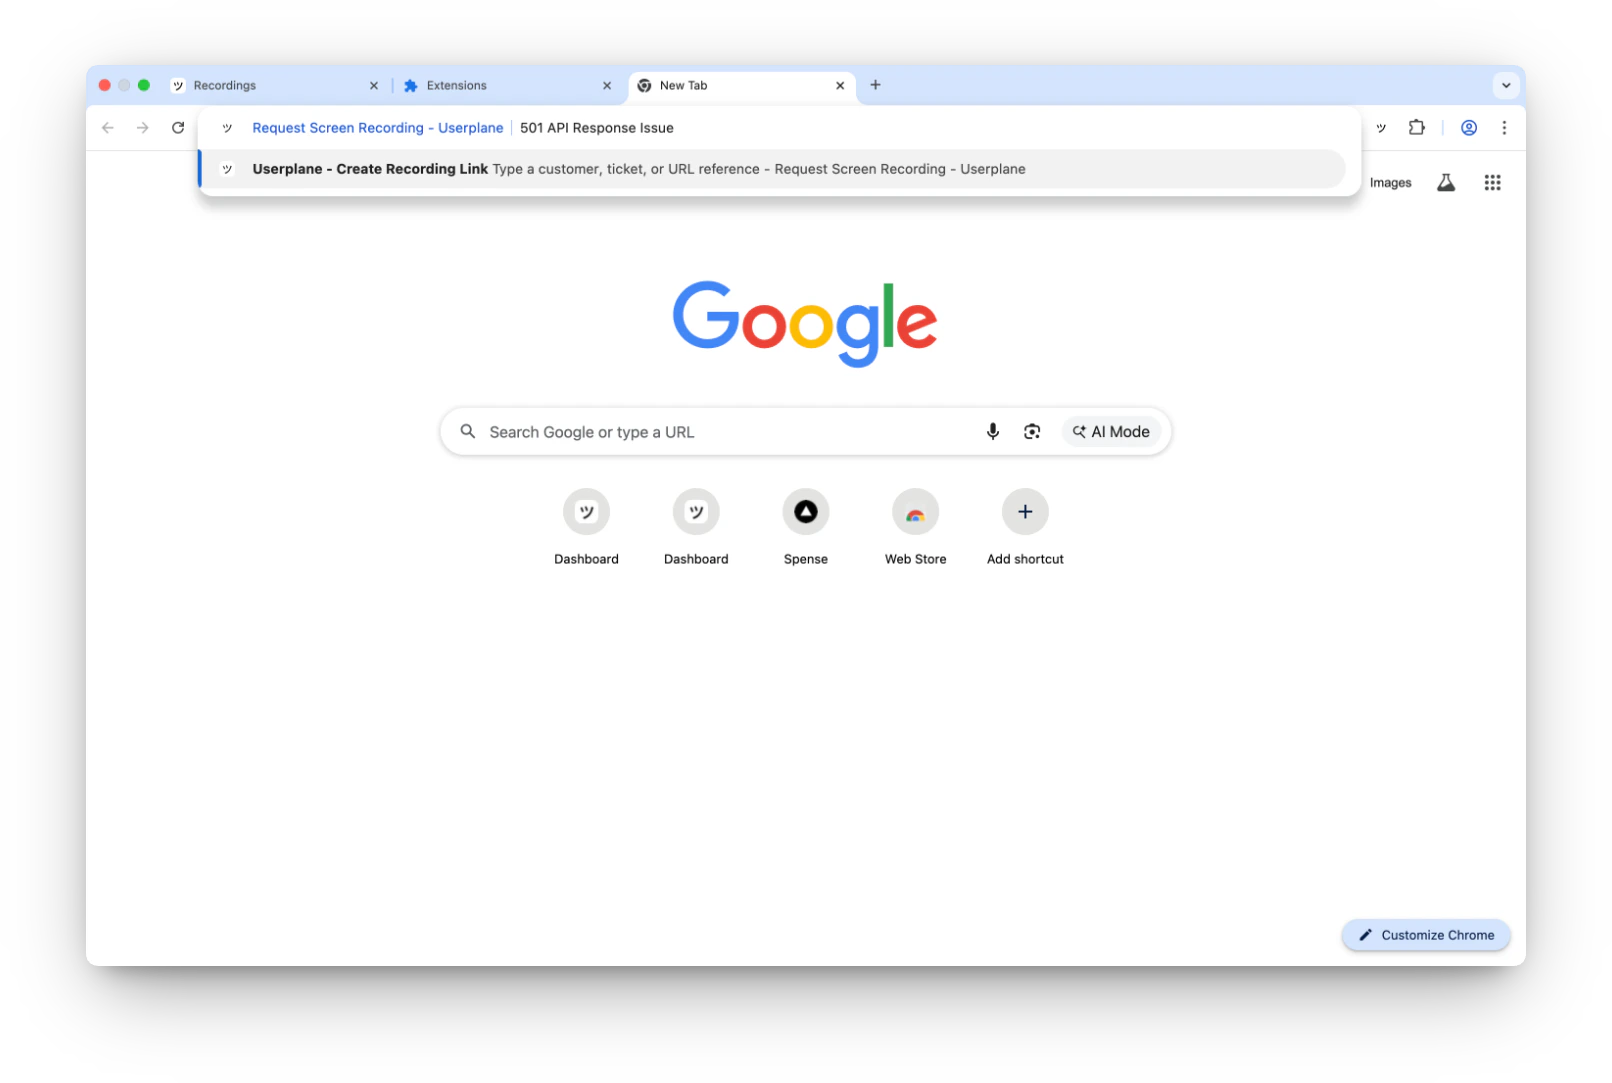 Type a reference — a customer name, ticket number, or URL — and press **Enter**. The side panel opens to the Create Link form with your reference pre-filled.
 * **Domain** (required) — select from your workspace's domains.
* **Project** (optional) — associate the link with a project.
* **Reusable** — toggle for single or multiple recordings.
Click **Create Link**. The Share Link screen appears.
Click **Copy Link** to copy the URL to your clipboard, then paste it into your help desk reply, email, or chat.
The omnibox works well when the reference is already known — such as a ticket number or
customer name — and you want to skip opening the side panel first.
## Prefill Reference
When **Prefill Reference** is enabled in [Settings](/integrations/chrome-extension-settings), the Create Link form auto-populates the **Link Reference** field with the URL of your current active tab — for example, the help desk ticket you're viewing.
Prefill Reference is **on by default**. Toggle it off in [extension settings](/integrations/chrome-extension-settings) to enter references manually.
Prefill Reference works with all creation methods — side panel, keyboard shortcut, context menu, and omnibox. When using the omnibox, the typed reference overrides the auto-populated URL.
## When to use each method
| Method | Best for | Reference |
| ------------------------------------- | --------------------------------------------- | ------------------------------- |
| **Side panel Create tab** | When you're already in the side panel | Auto-populated or manual |
| **Keyboard shortcut** (`Cmd+Shift+Y`) | Quick link creation from any tab | Auto-populated from current tab |
| **Context menu** (right-click) | Creating a link while viewing a specific page | Auto-populated from current tab |
| **Omnibox** (`userplane` + Tab) | When you know the exact reference to use | Typed by you |
All methods produce the same recording link — the only difference is how you reach the form and what's pre-filled.
## Related articles
* [Chrome Extension Side Panel](/integrations/chrome-extension-side-panel) — overview of the side panel navigation.
* [Chrome Extension Link Management](/integrations/chrome-extension-manage-links) — browse, edit, and delete links.
* [Chrome Extension Recordings](/integrations/chrome-extension-recordings) — browse recordings received from your links.
* [Requesting a Recording](/recording/requesting) — creating links from the Userplane dashboard.
* [Reusable Links](/recording-links/reusable) — how reusable links work.
* **Domain** (required) — select from your workspace's domains.
* **Project** (optional) — associate the link with a project.
* **Reusable** — toggle for single or multiple recordings.
Click **Create Link**. The Share Link screen appears.
Click **Copy Link** to copy the URL to your clipboard, then paste it into your help desk reply, email, or chat.
The omnibox works well when the reference is already known — such as a ticket number or
customer name — and you want to skip opening the side panel first.
## Prefill Reference
When **Prefill Reference** is enabled in [Settings](/integrations/chrome-extension-settings), the Create Link form auto-populates the **Link Reference** field with the URL of your current active tab — for example, the help desk ticket you're viewing.
Prefill Reference is **on by default**. Toggle it off in [extension settings](/integrations/chrome-extension-settings) to enter references manually.
Prefill Reference works with all creation methods — side panel, keyboard shortcut, context menu, and omnibox. When using the omnibox, the typed reference overrides the auto-populated URL.
## When to use each method
| Method | Best for | Reference |
| ------------------------------------- | --------------------------------------------- | ------------------------------- |
| **Side panel Create tab** | When you're already in the side panel | Auto-populated or manual |
| **Keyboard shortcut** (`Cmd+Shift+Y`) | Quick link creation from any tab | Auto-populated from current tab |
| **Context menu** (right-click) | Creating a link while viewing a specific page | Auto-populated from current tab |
| **Omnibox** (`userplane` + Tab) | When you know the exact reference to use | Typed by you |
All methods produce the same recording link — the only difference is how you reach the form and what's pre-filled.
## Related articles
* [Chrome Extension Side Panel](/integrations/chrome-extension-side-panel) — overview of the side panel navigation.
* [Chrome Extension Link Management](/integrations/chrome-extension-manage-links) — browse, edit, and delete links.
* [Chrome Extension Recordings](/integrations/chrome-extension-recordings) — browse recordings received from your links.
* [Requesting a Recording](/recording/requesting) — creating links from the Userplane dashboard.
* [Reusable Links](/recording-links/reusable) — how reusable links work.