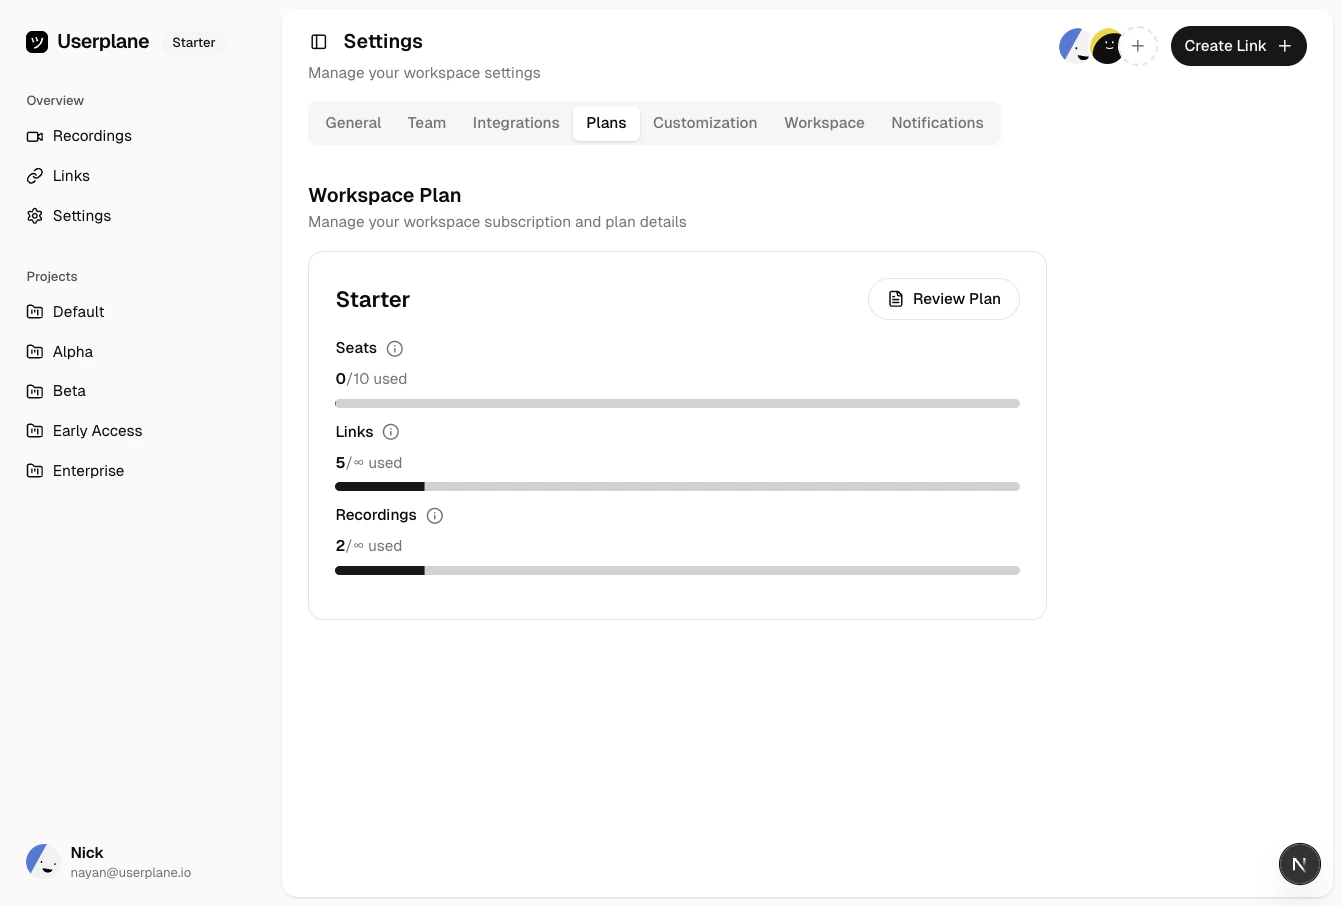
Review the available plans and their resource allocations.
3
Select a plan
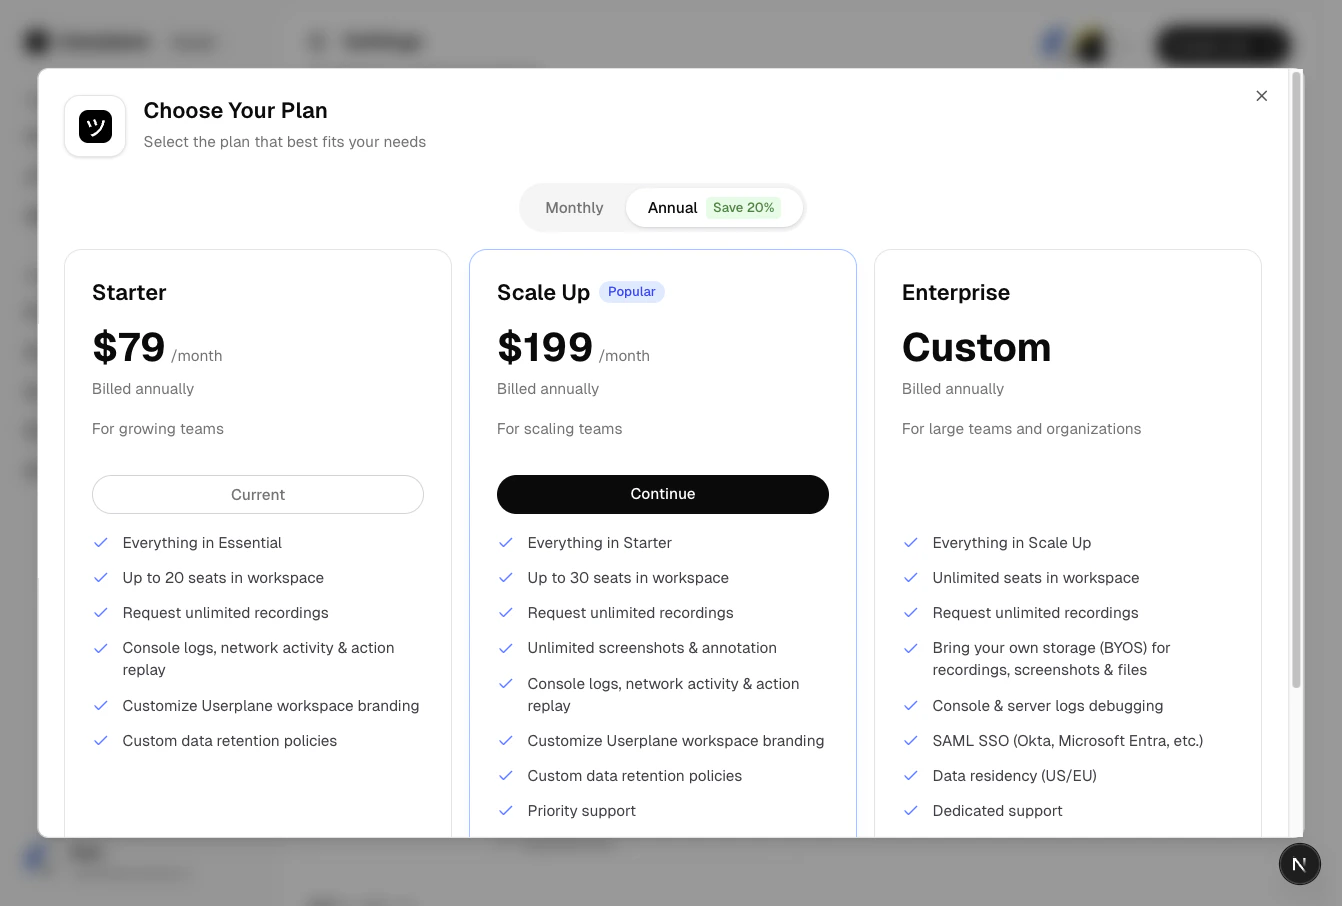
Click Upgrade or select a higher plan. You can choose between monthly and annual billing.
Plan selection
4
Complete checkout
If this is your first paid subscription, you are redirected to the checkout page
to enter payment details. Complete the checkout. Your workspace is upgraded immediately.
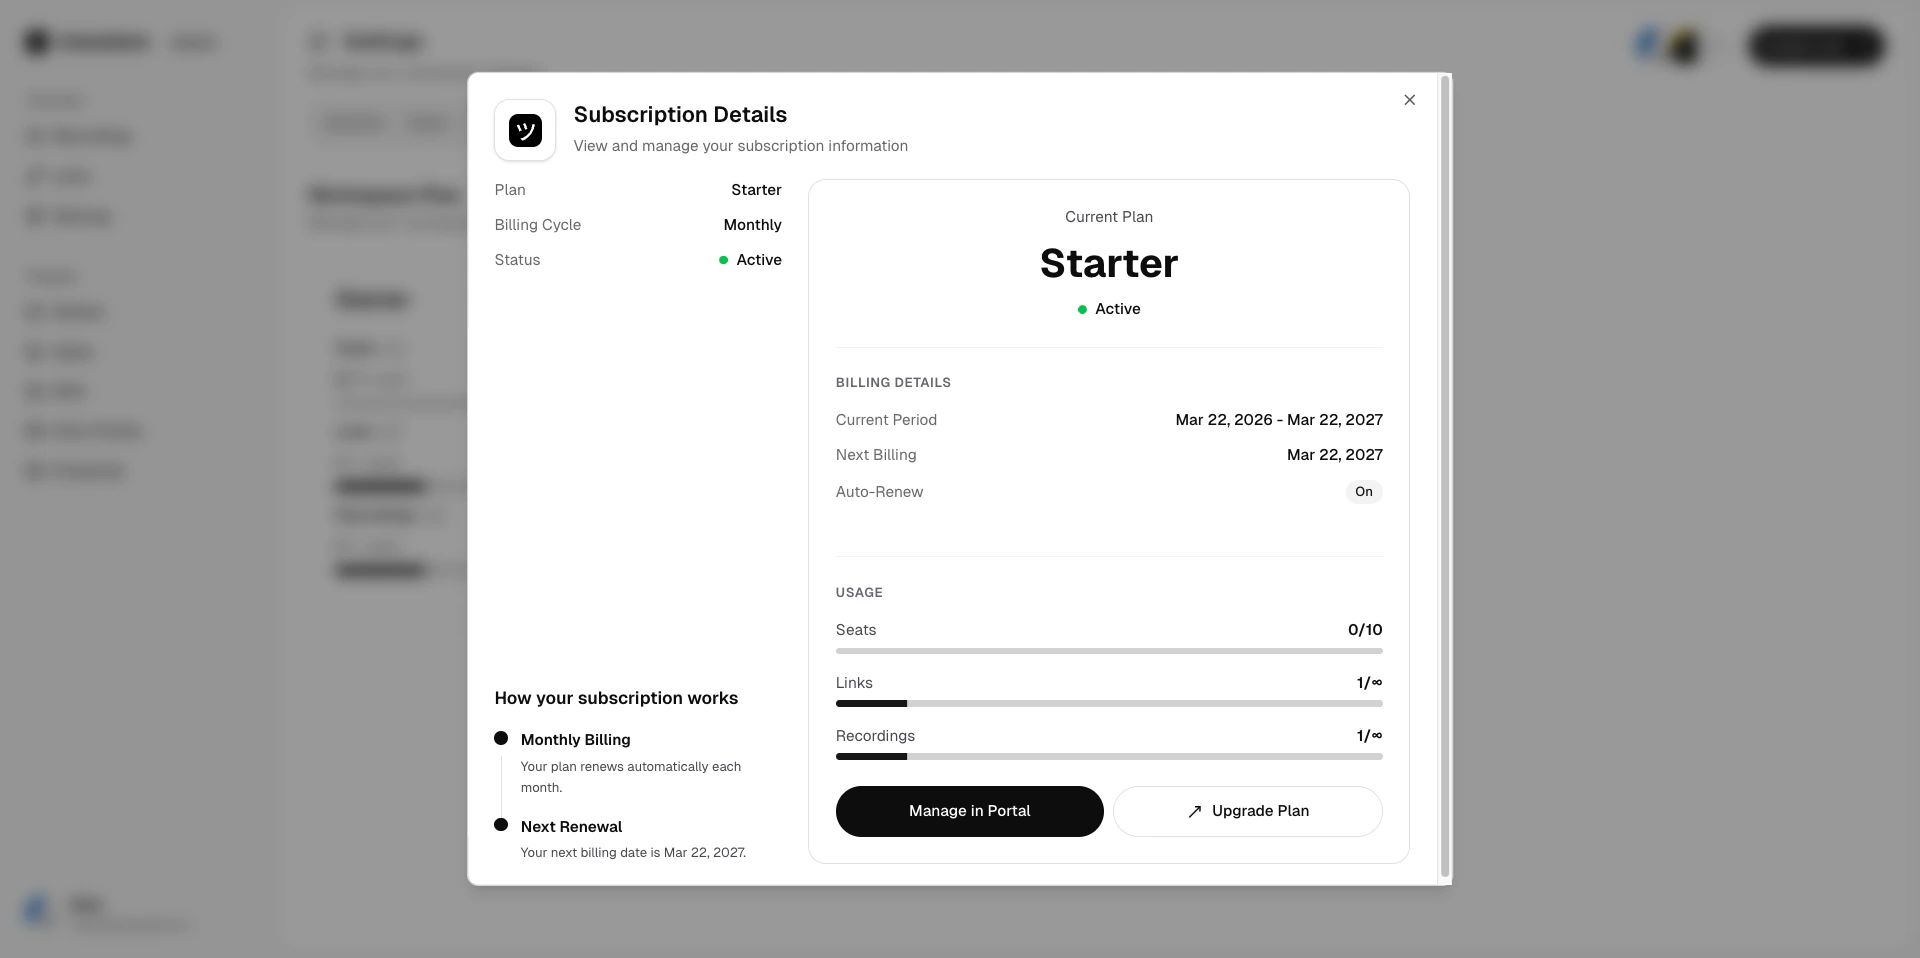
Admins can view plan details and pricing, including a preview of the new plan’s resource allocations and cost. From there, they are redirected to the checkout flow alongside the owner approval process.
{"docsConfig":{"theme":"aspen","$schema":"https://mintlify.com/docs.json","name":"Userplane Docs","colors":{"primary":"#000000","light":"#FAFAFA","dark":"#000000"},"logo":{"light":"https://mintcdn.com/userplane/e34bWffW8FdiqmQz/static/logo-light.svg?fit=max\u0026auto=format\u0026n=e34bWffW8FdiqmQz\u0026q=85\u0026s=b60f979b7800d446f3f5d5274c095cb2","dark":"https://mintcdn.com/userplane/e34bWffW8FdiqmQz/static/logo-dark.svg?fit=max\u0026auto=format\u0026n=e34bWffW8FdiqmQz\u0026q=85\u0026s=f638b932d019423317aaca6685f22ea6"},"favicon":"https://mintcdn.com/userplane/e34bWffW8FdiqmQz/static/favicon.svg?fit=max\u0026auto=format\u0026n=e34bWffW8FdiqmQz\u0026q=85\u0026s=fd9fbcc5e1783343c767381ce1744d03","api":{"playground":{"display":"interactive"}},"appearance":{"default":"light","strict":true},"navbar":{"primary":{"type":"button","label":"Dashboard","href":"https://dash.userplane.io"}},"styling":{"latex":true},"navigation":{"pages":[]}},"deployment":{"deploymentMetadataValue":{"subdomain":"userplane","hasAudioNarration":false,"actualSubdomain":"userplane","customDomains":["docs.userplane.io"],"gitSource":{"type":"github","owner":"0xnyn","repo":"userplane","deployBranch":"main","contentDirectory":"apps/docs","isPrivate":true,"mountPath":"","label":""},"chroma":{"liveDeploymentHistoryId":"6a21eb6f2fb2a99bab92da64","collectionId":"8e53ea74-03f5-4b56-ab3a-aff2a4fe9720","schemaVersion":"v2"},"entitlements":{},"buildId":"6a21eb6f2fb2a99bab92da64:success","clientVersion":"0.0.3908","searchFilterCounts":[{"language":"default","tag":"Integrations","count":62},{"language":"default","tag":"Guide","count":47},{"language":"default","tag":"Extensions \u0026 Plugins","count":34},{"language":"default","tag":"API","count":28},{"language":"default","tag":"Developer","count":24},{"language":"default","tag":"Recordings","count":21},{"language":"default","tag":"Help Desk","count":16},{"language":"default","tag":"Claude Code","count":14},{"language":"default","tag":"Framework Guides","count":13},{"language":"default","tag":"Getting Started","count":12}]},"assistantConfig":{"enableAskAiButton":false,"enableStarterQuestions":false,"enableAskAiSearchBar":true},"hasChatPermissions":false,"hasWebMcpPermissions":false,"toggles":[{"name":"kill-isr","enabled":true,"variant":{"name":"disabled","enabled":false,"feature_enabled":true},"impressionData":false},{"name":"agent-mintlify-slack","enabled":true,"variant":{"name":"disabled","enabled":false,"feature_enabled":true},"impressionData":false},{"name":"editor-v7-file-tree","enabled":true,"variant":{"name":"disabled","enabled":false,"feature_enabled":true},"impressionData":false},{"name":"agent-integrations-settings","enabled":true,"variant":{"name":"disabled","enabled":false,"feature_enabled":true},"impressionData":false},{"name":"automations-pr-grouping","enabled":true,"variant":{"name":"disabled","enabled":false,"feature_enabled":true},"impressionData":false},{"name":"custom-prefix","enabled":true,"variant":{"name":"disabled","enabled":false,"feature_enabled":true},"impressionData":false},{"name":"analytics-v7","enabled":true,"variant":{"name":"disabled","enabled":false,"feature_enabled":true},"impressionData":false},{"name":"user-flows-analytics","enabled":true,"variant":{"name":"disabled","enabled":false,"feature_enabled":true},"impressionData":false},{"name":"no-publish-flow","enabled":true,"variant":{"name":"disabled","enabled":false,"feature_enabled":true},"impressionData":false},{"name":"workos-onboarding","enabled":true,"variant":{"name":"disabled","enabled":false,"feature_enabled":true},"impressionData":false},{"name":"llms-txt-v2","enabled":true,"variant":{"name":"disabled","enabled":false,"feature_enabled":true},"impressionData":false},{"name":"pause-universal-search-reconcile","enabled":true,"variant":{"name":"disabled","enabled":false,"feature_enabled":true},"impressionData":false},{"name":"snapshot-serving-live","enabled":true,"variant":{"name":"disabled","enabled":false,"feature_enabled":true},"impressionData":false},{"name":"stripTemperatureMiddleware","enabled":true,"variant":{"name":"disabled","enabled":false,"feature_enabled":true},"impressionData":false},{"name":"per-site-search-delta","enabled":true,"variant":{"name":"disabled","enabled":false,"feature_enabled":true},"impressionData":false},{"name":"support-platform-pylon-zendesk","enabled":true,"variant":{"name":"disabled","enabled":false,"feature_enabled":true},"impressionData":false},{"name":"editor-branches-v2-autocommit","enabled":true,"variant":{"name":"disabled","enabled":false,"feature_enabled":true},"impressionData":false},{"name":"editor-branches-v2","enabled":true,"variant":{"name":"disabled","enabled":false,"feature_enabled":true},"impressionData":false},{"name":"snapshot-serving","enabled":true,"variant":{"name":"disabled","enabled":false,"feature_enabled":true},"impressionData":false},{"name":"instant-rollback","enabled":true,"variant":{"name":"disabled","enabled":false,"feature_enabled":true},"impressionData":false},{"name":"granular-notifications-server","enabled":true,"variant":{"name":"disabled","enabled":false,"feature_enabled":true},"impressionData":false},{"name":"granular-notifications","enabled":true,"variant":{"name":"disabled","enabled":false,"feature_enabled":true},"impressionData":false},{"name":"editor-private-page-search","enabled":true,"variant":{"name":"disabled","enabled":false,"feature_enabled":true},"impressionData":false},{"name":"automations-fable","enabled":true,"variant":{"name":"disabled","enabled":false,"feature_enabled":true},"impressionData":false},{"name":"fixed-ai-action-pricing","enabled":true,"variant":{"name":"disabled","enabled":false,"feature_enabled":true},"impressionData":false},{"name":"automation-resolve-merge-conflict","enabled":true,"variant":{"name":"disabled","enabled":false,"feature_enabled":true},"impressionData":false},{"name":"scoped-publishing","enabled":true,"variant":{"name":"disabled","enabled":false,"feature_enabled":true},"impressionData":false},{"name":"mintql","enabled":true,"variant":{"name":"disabled","enabled":false,"feature_enabled":true},"impressionData":false},{"name":"page-level-analytics","enabled":true,"variant":{"name":"disabled","enabled":false,"feature_enabled":true},"impressionData":false},{"name":"teamspace","enabled":true,"variant":{"name":"disabled","enabled":false,"feature_enabled":true},"impressionData":false},{"name":"editor-version-history-v2","enabled":true,"variant":{"name":"disabled","enabled":false,"feature_enabled":true},"impressionData":false},{"name":"vite-origin","enabled":true,"variant":{"name":"disabled","enabled":false,"feature_enabled":true},"impressionData":false},{"name":"editor-nav-generations","enabled":true,"variant":{"name":"disabled","enabled":false,"feature_enabled":true},"impressionData":false},{"name":"billing-page-v2","enabled":true,"variant":{"name":"disabled","enabled":false,"feature_enabled":true},"impressionData":false},{"name":"workspace-projects","enabled":true,"variant":{"name":"disabled","enabled":false,"feature_enabled":true},"impressionData":false},{"name":"assistant-v5","enabled":true,"variant":{"name":"disabled","enabled":false,"feature_enabled":true},"impressionData":false},{"name":"byok-sep-25","enabled":true,"variant":{"name":"disabled","enabled":false,"feature_enabled":true},"impressionData":false},{"name":"fork-pr-previews","enabled":true,"variant":{"name":"disabled","enabled":false,"feature_enabled":true},"impressionData":false},{"name":"revalidation-jwt","enabled":true,"variant":{"name":"disabled","enabled":false,"feature_enabled":true},"impressionData":false},{"name":"editor-agent-model-picker","enabled":true,"variant":{"name":"disabled","enabled":false,"feature_enabled":true},"impressionData":false},{"name":"client-snapshot-docs-config","enabled":true,"variant":{"name":"disabled","enabled":false,"feature_enabled":true},"impressionData":false},{"name":"hobby-abuse-scan","enabled":true,"variant":{"name":"disabled","enabled":false,"feature_enabled":true},"impressionData":false},{"name":"dashboard-inbox","enabled":true,"variant":{"name":"disabled","enabled":false,"feature_enabled":true},"impressionData":false}],"isAtlas":false,"googleFontsInlined":false},"customCss":[],"page":{"pagePath":"billing/upgrading","slug":"/billing/upgrading","pageMetadata":{"title":"Upgrading Your Plan","description":"Move to a higher plan tier for more seats, recordings, and features","href":"/billing/upgrading"},"description":{"compiledSource":"\"use strict\";\nconst {jsx: _jsx} = arguments[0];\nconst {useMDXComponents: _provideComponents} = arguments[0];\nfunction _createMdxContent(props) {\n const _components = {\n p: \"p\",\n ..._provideComponents(),\n ...props.components\n };\n return _jsx(_components.p, {\n children: \"Move to a higher plan tier for more seats, recordings, and features\"\n });\n}\nfunction MDXContent(props = {}) {\n const {wrapper: MDXLayout} = {\n ..._provideComponents(),\n ...props.components\n };\n return MDXLayout ? _jsx(MDXLayout, {\n ...props,\n children: _jsx(_createMdxContent, {\n ...props\n })\n }) : _createMdxContent(props);\n}\nreturn {\n default: MDXContent\n};\n","frontmatter":{},"scope":{}},"pageType":"default","mdx":{"mdxSource":{"compiledSource":"\"use strict\";const{Fragment:_Fragment,jsx:_jsx,jsxs:_jsxs}=arguments[0];const{useMDXComponents:_provideComponents}=arguments[0];function _createMdxContent(props){const _components={a:`a`,li:`li`,p:`p`,strong:`strong`,tbody:`tbody`,td:`td`,th:`th`,thead:`thead`,tr:`tr`,ul:`ul`,..._provideComponents(),...props.components},{Frame,Heading,Note,OptimizedImage,Step,Steps,Table}=_components;if(!Frame)_missingMdxReference(`Frame`,true);if(!Heading)_missingMdxReference(`Heading`,true);if(!Note)_missingMdxReference(`Note`,true);if(!OptimizedImage)_missingMdxReference(`OptimizedImage`,true);if(!Step)_missingMdxReference(`Step`,true);if(!Steps)_missingMdxReference(`Steps`,true);if(!Table)_missingMdxReference(`Table`,true);return _jsxs(_Fragment,{children:[_jsx(_components.p,{children:`Upgrading your plan gives your workspace more seats, recording links, recordings, and access to additional features.`}),`\n`,_jsx(Heading,{level:`2`,id:`who-can-upgrade`,children:`Who can upgrade`}),`\n`,_jsx(_components.p,{children:`The upgrade flow depends on your role:`}),`\n`,_jsxs(Table,{children:[_jsx(_components.thead,{children:_jsxs(_components.tr,{children:[_jsx(_components.th,{children:`Role`}),_jsx(_components.th,{children:`What happens`})]})}),_jsxs(_components.tbody,{children:[_jsxs(_components.tr,{children:[_jsx(_components.td,{children:_jsx(_components.strong,{children:`Owner`})}),_jsx(_components.td,{children:`Can upgrade directly through the checkout flow.`})]}),_jsxs(_components.tr,{children:[_jsx(_components.td,{children:_jsx(_components.strong,{children:`Admin`})}),_jsx(_components.td,{children:`Can preview plan details and initiate the upgrade flow.`})]}),_jsxs(_components.tr,{children:[_jsx(_components.td,{children:_jsx(_components.strong,{children:`Member`})}),_jsx(_components.td,{children:`Can request an upgrade. An email is sent to workspace owners notifying them of the request.`})]})]})]}),`\n`,_jsx(Heading,{level:`2`,id:`upgrading-as-an-owner`,children:`Upgrading as an owner`}),`\n`,_jsxs(Steps,{children:[_jsxs(Step,{title:`Open Billing settings`,children:[_jsxs(_components.p,{children:[`Go to `,_jsx(_components.a,{href:`https://dash.userplane.io/_/settings?tab=plan-usage\u0026plan-modal=detailed`,children:`Workspace Settings > Billing`}),`.`]}),_jsx(Frame,{caption:`Current plan details`,children:_jsx(OptimizedImage,{src:`https://mintcdn.com/userplane/iHJrxtyvOmNXmfMS/media/billing/current-plan.png?fit=max\u0026auto=format\u0026n=iHJrxtyvOmNXmfMS\u0026q=85\u0026s=24da8397994e8cdd3ba79cccbcd79feb`,\"data-og-width\":`1342`,width:`1342`,\"data-og-height\":`906`,height:`906`,\"data-path\":`media/billing/current-plan.png`,\"data-optimize\":`true`,\"data-opv\":`3`,srcset:`https://mintcdn.com/userplane/iHJrxtyvOmNXmfMS/media/billing/current-plan.png?w=280\u0026fit=max\u0026auto=format\u0026n=iHJrxtyvOmNXmfMS\u0026q=85\u0026s=2cf6e59ecb4ddffd0ee191def975fa37 280w, https://mintcdn.com/userplane/iHJrxtyvOmNXmfMS/media/billing/current-plan.png?w=560\u0026fit=max\u0026auto=format\u0026n=iHJrxtyvOmNXmfMS\u0026q=85\u0026s=f4f845a8038a7f915e20f5412c7737e4 560w, https://mintcdn.com/userplane/iHJrxtyvOmNXmfMS/media/billing/current-plan.png?w=840\u0026fit=max\u0026auto=format\u0026n=iHJrxtyvOmNXmfMS\u0026q=85\u0026s=f3066a626bdad3e8388978c17d2c2737 840w, https://mintcdn.com/userplane/iHJrxtyvOmNXmfMS/media/billing/current-plan.png?w=1100\u0026fit=max\u0026auto=format\u0026n=iHJrxtyvOmNXmfMS\u0026q=85\u0026s=e6c53c14ecdd2542a4e158d51843411b 1100w, https://mintcdn.com/userplane/iHJrxtyvOmNXmfMS/media/billing/current-plan.png?w=1650\u0026fit=max\u0026auto=format\u0026n=iHJrxtyvOmNXmfMS\u0026q=85\u0026s=31b54186f045c95cd9251a4ef9d56f9e 1650w, https://mintcdn.com/userplane/iHJrxtyvOmNXmfMS/media/billing/current-plan.png?w=2500\u0026fit=max\u0026auto=format\u0026n=iHJrxtyvOmNXmfMS\u0026q=85\u0026s=e833f85f299e060829d4e852a6eca015 2500w`})})]}),_jsx(Step,{title:`Compare plans`,children:_jsx(_components.p,{children:`Review the available plans and their resource allocations.`})}),_jsxs(Step,{title:`Select a plan`,children:[_jsxs(_components.p,{children:[`Click `,_jsx(_components.strong,{children:`Upgrade`}),` or select a higher plan. You can choose between monthly and annual billing.`]}),_jsx(Frame,{caption:`Plan selection`,children:_jsx(OptimizedImage,{src:`https://mintcdn.com/userplane/iHJrxtyvOmNXmfMS/media/billing/upgrade-plan-selection.png?fit=max\u0026auto=format\u0026n=iHJrxtyvOmNXmfMS\u0026q=85\u0026s=72f2fc8b329a53688494cdbbc9e7348d`,\"data-og-width\":`1342`,width:`1342`,\"data-og-height\":`906`,height:`906`,\"data-path\":`media/billing/upgrade-plan-selection.png`,\"data-optimize\":`true`,\"data-opv\":`3`,srcset:`https://mintcdn.com/userplane/iHJrxtyvOmNXmfMS/media/billing/upgrade-plan-selection.png?w=280\u0026fit=max\u0026auto=format\u0026n=iHJrxtyvOmNXmfMS\u0026q=85\u0026s=732c537ef64d3ff681dc648d24abecca 280w, https://mintcdn.com/userplane/iHJrxtyvOmNXmfMS/media/billing/upgrade-plan-selection.png?w=560\u0026fit=max\u0026auto=format\u0026n=iHJrxtyvOmNXmfMS\u0026q=85\u0026s=a38c173b857e0d4bcb04083accac3975 560w, https://mintcdn.com/userplane/iHJrxtyvOmNXmfMS/media/billing/upgrade-plan-selection.png?w=840\u0026fit=max\u0026auto=format\u0026n=iHJrxtyvOmNXmfMS\u0026q=85\u0026s=dea3215bffd35035733b7285ec829553 840w, https://mintcdn.com/userplane/iHJrxtyvOmNXmfMS/media/billing/upgrade-plan-selection.png?w=1100\u0026fit=max\u0026auto=format\u0026n=iHJrxtyvOmNXmfMS\u0026q=85\u0026s=8a17a49e222067dab6ee6e7857425d61 1100w, https://mintcdn.com/userplane/iHJrxtyvOmNXmfMS/media/billing/upgrade-plan-selection.png?w=1650\u0026fit=max\u0026auto=format\u0026n=iHJrxtyvOmNXmfMS\u0026q=85\u0026s=f2e68867a70e0a8f0d3ea109a799d0ae 1650w, https://mintcdn.com/userplane/iHJrxtyvOmNXmfMS/media/billing/upgrade-plan-selection.png?w=2500\u0026fit=max\u0026auto=format\u0026n=iHJrxtyvOmNXmfMS\u0026q=85\u0026s=a347a580878fc2cf6657defcbacf54b1 2500w`})})]}),_jsx(Step,{title:`Complete checkout`,children:_jsx(_components.p,{children:`If this is your first paid subscription, you are redirected to the checkout page\nto enter payment details. Complete the checkout. Your workspace is upgraded immediately.`})})]}),`\n`,_jsx(Heading,{level:`2`,id:`previewing-as-an-admin`,children:`Previewing as an admin`}),`\n`,_jsx(_components.p,{children:`Admins can view plan details and pricing, including a preview of the new plan’s resource allocations and cost. From there, they are redirected to the checkout flow alongside the owner approval process.`}),`\n`,_jsx(Frame,{caption:`Current plan details`,children:_jsx(OptimizedImage,{src:`https://mintcdn.com/userplane/iHJrxtyvOmNXmfMS/media/billing/workspace-plan/current-plan-details.png?fit=max\u0026auto=format\u0026n=iHJrxtyvOmNXmfMS\u0026q=85\u0026s=4399802cfa57312f59c124fa54f345bf`,\"data-og-width\":`1920`,width:`1920`,\"data-og-height\":`958`,height:`958`,\"data-path\":`media/billing/workspace-plan/current-plan-details.png`,\"data-optimize\":`true`,\"data-opv\":`3`,srcset:`https://mintcdn.com/userplane/iHJrxtyvOmNXmfMS/media/billing/workspace-plan/current-plan-details.png?w=280\u0026fit=max\u0026auto=format\u0026n=iHJrxtyvOmNXmfMS\u0026q=85\u0026s=05a7841505876201cba7b3752a9ade03 280w, https://mintcdn.com/userplane/iHJrxtyvOmNXmfMS/media/billing/workspace-plan/current-plan-details.png?w=560\u0026fit=max\u0026auto=format\u0026n=iHJrxtyvOmNXmfMS\u0026q=85\u0026s=012d24c2396e1c3ee16d81fbfa1dcb7f 560w, https://mintcdn.com/userplane/iHJrxtyvOmNXmfMS/media/billing/workspace-plan/current-plan-details.png?w=840\u0026fit=max\u0026auto=format\u0026n=iHJrxtyvOmNXmfMS\u0026q=85\u0026s=777113660475f79d2fcd486ea6148fba 840w, https://mintcdn.com/userplane/iHJrxtyvOmNXmfMS/media/billing/workspace-plan/current-plan-details.png?w=1100\u0026fit=max\u0026auto=format\u0026n=iHJrxtyvOmNXmfMS\u0026q=85\u0026s=60343badf123b635bccd542d031dd2e6 1100w, https://mintcdn.com/userplane/iHJrxtyvOmNXmfMS/media/billing/workspace-plan/current-plan-details.png?w=1650\u0026fit=max\u0026auto=format\u0026n=iHJrxtyvOmNXmfMS\u0026q=85\u0026s=109b1b31c6294f61103bd38288e8ed5b 1650w, https://mintcdn.com/userplane/iHJrxtyvOmNXmfMS/media/billing/workspace-plan/current-plan-details.png?w=2500\u0026fit=max\u0026auto=format\u0026n=iHJrxtyvOmNXmfMS\u0026q=85\u0026s=7fd1c5cbaf901f29e3e08b8c03407316 2500w`})}),`\n`,_jsx(Heading,{level:`2`,id:`requesting-as-a-member`,children:`Requesting as a member`}),`\n`,_jsxs(Steps,{children:[_jsxs(Step,{title:`Open Billing settings`,children:[_jsxs(_components.p,{children:[`Go to `,_jsx(_components.a,{href:`https://dash.userplane.io/_/settings?tab=plan-usage\u0026plan-modal=detailed`,children:`Workspace Settings >\nBilling`}),`.`]}),_jsx(Frame,{caption:`Current plan details`,children:_jsx(OptimizedImage,{src:`https://mintcdn.com/userplane/iHJrxtyvOmNXmfMS/media/billing/workspace-plan/current-plan-details.png?fit=max\u0026auto=format\u0026n=iHJrxtyvOmNXmfMS\u0026q=85\u0026s=4399802cfa57312f59c124fa54f345bf`,\"data-og-width\":`1920`,width:`1920`,\"data-og-height\":`958`,height:`958`,\"data-path\":`media/billing/workspace-plan/current-plan-details.png`,\"data-optimize\":`true`,\"data-opv\":`3`,srcset:`https://mintcdn.com/userplane/iHJrxtyvOmNXmfMS/media/billing/workspace-plan/current-plan-details.png?w=280\u0026fit=max\u0026auto=format\u0026n=iHJrxtyvOmNXmfMS\u0026q=85\u0026s=05a7841505876201cba7b3752a9ade03 280w, https://mintcdn.com/userplane/iHJrxtyvOmNXmfMS/media/billing/workspace-plan/current-plan-details.png?w=560\u0026fit=max\u0026auto=format\u0026n=iHJrxtyvOmNXmfMS\u0026q=85\u0026s=012d24c2396e1c3ee16d81fbfa1dcb7f 560w, https://mintcdn.com/userplane/iHJrxtyvOmNXmfMS/media/billing/workspace-plan/current-plan-details.png?w=840\u0026fit=max\u0026auto=format\u0026n=iHJrxtyvOmNXmfMS\u0026q=85\u0026s=777113660475f79d2fcd486ea6148fba 840w, https://mintcdn.com/userplane/iHJrxtyvOmNXmfMS/media/billing/workspace-plan/current-plan-details.png?w=1100\u0026fit=max\u0026auto=format\u0026n=iHJrxtyvOmNXmfMS\u0026q=85\u0026s=60343badf123b635bccd542d031dd2e6 1100w, https://mintcdn.com/userplane/iHJrxtyvOmNXmfMS/media/billing/workspace-plan/current-plan-details.png?w=1650\u0026fit=max\u0026auto=format\u0026n=iHJrxtyvOmNXmfMS\u0026q=85\u0026s=109b1b31c6294f61103bd38288e8ed5b 1650w, https://mintcdn.com/userplane/iHJrxtyvOmNXmfMS/media/billing/workspace-plan/current-plan-details.png?w=2500\u0026fit=max\u0026auto=format\u0026n=iHJrxtyvOmNXmfMS\u0026q=85\u0026s=7fd1c5cbaf901f29e3e08b8c03407316 2500w`})})]}),_jsx(Step,{title:`Request an upgrade`,children:_jsxs(_components.p,{children:[`Click `,_jsx(_components.strong,{children:`Request Upgrade`}),`. An email notification is sent to all workspace owners with details of\nthe requested plan.`]})}),_jsx(Step,{title:`Owner completes the upgrade`,children:_jsx(_components.p,{children:`An owner reviews the request and completes the upgrade through the checkout flow.`})})]}),`\n`,_jsx(Heading,{level:`2`,id:`plan-changes`,children:`Plan changes`}),`\n`,_jsx(_components.p,{children:`When you upgrade:`}),`\n`,_jsxs(_components.ul,{children:[`\n`,_jsx(_components.li,{children:`The new plan takes effect immediately.`}),`\n`,_jsx(_components.li,{children:`Existing usage counts carry over to the new plan’s limits.`}),`\n`,_jsx(_components.li,{children:`Billing is adjusted for the remaining time in your current billing period.`}),`\n`,_jsx(_components.li,{children:`Seat add-ons are retained on the new plan.`}),`\n`,_jsx(_components.li,{children:`Any flexible credits are applied to the next invoice.`}),`\n`,_jsx(_components.li,{children:`On annual plans, unused rollover resources carry over.`}),`\n`]}),`\n`,_jsx(Note,{children:_jsxs(_components.p,{children:[`Upgrades are not available during the trial period. Choose a plan after your trial ends or when\nyou are ready to commit. See `,_jsx(_components.a,{href:`/billing/trial`,children:`Trial Plans`}),` for details.`]})}),`\n`,_jsx(Heading,{level:`2`,id:`related-articles`,children:`Related articles`}),`\n`,_jsxs(_components.ul,{children:[`\n`,_jsxs(_components.li,{children:[_jsx(_components.a,{href:`/billing/overview`,children:`Subscription Overview`}),` — plan tiers and pricing.`]}),`\n`,_jsxs(_components.li,{children:[_jsx(_components.a,{href:`/billing/usage-limits`,children:`Understanding Usage Limits`}),` — what each plan includes.`]}),`\n`,_jsxs(_components.li,{children:[_jsx(_components.a,{href:`/billing/trial`,children:`Trial Plans`}),` — how the 14-day trial works.`]}),`\n`]})]})}function MDXContent(props={}){const{wrapper:MDXLayout}={..._provideComponents(),...props.components};return MDXLayout?_jsx(MDXLayout,{...props,children:_jsx(_createMdxContent,{...props})}):_createMdxContent(props)}return{default:MDXContent};function _missingMdxReference(id,component){throw new Error(`Expected `+(component?`component`:`object`)+\" `\"+id+\"` to be defined: you likely forgot to import, pass, or provide it.\")}","frontmatter":{},"scope":{"config":{},"pageMetadata":{"title":"Upgrading Your Plan","description":"Move to a higher plan tier for more seats, recordings, and features","href":"/billing/upgrading"}}},"mdxSourceWithNoJs":null},"mdxExtracts":{"tableOfContents":[{"title":"Who can upgrade","slug":"who-can-upgrade","depth":2,"children":[]},{"title":"Upgrading as an owner","slug":"upgrading-as-an-owner","depth":2,"children":[]},{"title":"Previewing as an admin","slug":"previewing-as-an-admin","depth":2,"children":[]},{"title":"Requesting as a member","slug":"requesting-as-a-member","depth":2,"children":[]},{"title":"Plan changes","slug":"plan-changes","depth":2,"children":[]},{"title":"Related articles","slug":"related-articles","depth":2,"children":[]}],"codeExamples":{}},"jsLinks":["/_mintlify/custom/userplane/95cb985acf23057a/eslint.config.js"],"subdomain":"userplane","siteName":"Userplane Docs","title":"Upgrading Your Plan - Userplane Docs","navMaps":{"firstHrefInVersion":{},"firstHrefInLanguage":{}},"lastModified":"2026-03-23T22:38:53.784Z","originalFileLocation":"billing/upgrading.mdx"},"headHtml":"\u003cscript data-mint-head>(function(){var d=document.documentElement,p=\"light\";if(!p){try{p=localStorage.getItem(\"isDarkMode\")}catch(e){}if(p==='true')p='dark';else if(p==='false')p='light';if(p!=='light'\u0026\u0026p!=='dark'\u0026\u0026p!=='system')p=\"light\"}var r=p==='system'?(matchMedia(\"(prefers-color-scheme: dark)\").matches?'dark':'light'):p;d.classList.remove(r==='dark'?'light':'dark');d.classList.add(r);d.setAttribute(\"data-theme-preference\",p)})();\u003c/script>\u003cmeta data-mint-head name=\"description\" content=\"Move to a higher plan tier for more seats, recordings, and features\">\u003cmeta data-mint-head name=\"application-name\" content=\"Userplane Docs\">\u003cmeta data-mint-head name=\"generator\" content=\"Mintlify\">\u003clink data-mint-head rel=\"icon\" type=\"image/png\" sizes=\"192x192\" href=\"/mintlify-assets/_mintlify/favicons/userplane/fDBjjV0nXQ3P7r2U/_generated/favicon/android-chrome-192x192.png\" media=\"(prefers-color-scheme: light)\">\u003clink data-mint-head rel=\"apple-touch-icon\" type=\"image/png\" sizes=\"180x180\" href=\"/mintlify-assets/_mintlify/favicons/userplane/fDBjjV0nXQ3P7r2U/_generated/favicon/apple-touch-icon.png\">\u003clink data-mint-head rel=\"icon\" type=\"image/png\" sizes=\"16x16\" href=\"/mintlify-assets/_mintlify/favicons/userplane/fDBjjV0nXQ3P7r2U/_generated/favicon/favicon-16x16.png\" media=\"(prefers-color-scheme: light)\">\u003clink data-mint-head rel=\"icon\" type=\"image/png\" sizes=\"32x32\" href=\"/mintlify-assets/_mintlify/favicons/userplane/fDBjjV0nXQ3P7r2U/_generated/favicon/favicon-32x32.png\" media=\"(prefers-color-scheme: light)\">\u003clink data-mint-head rel=\"shortcut icon\" type=\"image/x-icon\" href=\"/mintlify-assets/_mintlify/favicons/userplane/fDBjjV0nXQ3P7r2U/_generated/favicon/favicon.ico\" media=\"(prefers-color-scheme: light)\">\u003clink data-mint-head rel=\"icon\" type=\"image/png\" sizes=\"192x192\" href=\"/mintlify-assets/_mintlify/favicons/userplane/fDBjjV0nXQ3P7r2U/_generated/favicon-dark/android-chrome-192x192.png\" media=\"(prefers-color-scheme: dark)\">\u003clink data-mint-head rel=\"icon\" type=\"image/png\" sizes=\"16x16\" href=\"/mintlify-assets/_mintlify/favicons/userplane/fDBjjV0nXQ3P7r2U/_generated/favicon-dark/favicon-16x16.png\" media=\"(prefers-color-scheme: dark)\">\u003clink data-mint-head rel=\"icon\" type=\"image/png\" sizes=\"32x32\" href=\"/mintlify-assets/_mintlify/favicons/userplane/fDBjjV0nXQ3P7r2U/_generated/favicon-dark/favicon-32x32.png\" media=\"(prefers-color-scheme: dark)\">\u003clink data-mint-head rel=\"shortcut icon\" type=\"image/x-icon\" href=\"/mintlify-assets/_mintlify/favicons/userplane/fDBjjV0nXQ3P7r2U/_generated/favicon-dark/favicon.ico\" media=\"(prefers-color-scheme: dark)\">\u003cmeta data-mint-head property=\"og:title\" content=\"Upgrading Your Plan - Userplane Docs\">\u003cmeta data-mint-head property=\"og:description\" content=\"Move to a higher plan tier for more seats, recordings, and features\">\u003cmeta data-mint-head property=\"og:site_name\" content=\"Userplane Docs\">\u003cmeta data-mint-head property=\"og:url\" content=\"https://docs.userplane.io/billing/upgrading\">\u003cmeta data-mint-head property=\"og:type\" content=\"website\">\u003cmeta data-mint-head name=\"twitter:card\" content=\"summary_large_image\">\u003cmeta data-mint-head name=\"twitter:title\" content=\"Upgrading Your Plan - Userplane Docs\">\u003cmeta data-mint-head name=\"twitter:description\" content=\"Move to a higher plan tier for more seats, recordings, and features\">\u003cmeta data-mint-head name=\"msapplication-config\" content=\"/mintlify-assets/_mintlify/favicons/userplane/fDBjjV0nXQ3P7r2U/_generated/favicon/browserconfig.xml\">\u003cmeta data-mint-head name=\"apple-mobile-web-app-title\" content=\"Userplane Docs\">\u003cmeta data-mint-head name=\"msapplication-TileColor\" content=\"#000000\">\u003clink data-mint-head rel=\"canonical\" href=\"https://docs.userplane.io/billing/upgrading\">\u003clink data-mint-head rel=\"alternate\" type=\"application/xml\" href=\"/sitemap.xml\">\u003clink data-mint-head rel=\"alternate\" type=\"text/markdown\" href=\"/billing/upgrading.md\">\u003cscript data-mint-head type=\"application/ld+json\">{\"@context\":\"https://schema.org\",\"@graph\":[{\"@type\":\"Organization\",\"@id\":\"https://docs.userplane.io/#organization\",\"name\":\"Userplane Docs\",\"url\":\"https://docs.userplane.io\",\"logo\":{\"@type\":\"ImageObject\",\"url\":\"https://mintcdn.com/userplane/e34bWffW8FdiqmQz/static/logo-light.svg?fit=max\u0026auto=format\u0026n=e34bWffW8FdiqmQz\u0026q=85\u0026s=b60f979b7800d446f3f5d5274c095cb2\"}},{\"@type\":\"WebSite\",\"@id\":\"https://docs.userplane.io#website\",\"name\":\"Userplane Docs\",\"url\":\"https://docs.userplane.io\",\"publisher\":{\"@id\":\"https://docs.userplane.io/#organization\"}},{\"@type\":\"WebPage\",\"@id\":\"https://docs.userplane.io/billing/upgrading#webpage\",\"url\":\"https://docs.userplane.io/billing/upgrading\",\"name\":\"Upgrading Your Plan\",\"description\":\"Move to a higher plan tier for more seats, recordings, and features\",\"dateModified\":\"2026-03-23T22:38:53.784Z\",\"isPartOf\":{\"@id\":\"https://docs.userplane.io#website\"},\"breadcrumb\":{\"@id\":\"https://docs.userplane.io/billing/upgrading#breadcrumb\"}},{\"@type\":\"BreadcrumbList\",\"@id\":\"https://docs.userplane.io/billing/upgrading#breadcrumb\",\"itemListElement\":[{\"@type\":\"ListItem\",\"position\":1,\"name\":\"Billing\",\"item\":\"https://docs.userplane.io/billing/overview\"},{\"@type\":\"ListItem\",\"position\":2,\"name\":\"Plans \u0026 Usage\",\"item\":\"https://docs.userplane.io/billing/usage-limits\"},{\"@type\":\"ListItem\",\"position\":3,\"name\":\"Upgrading Your Plan\",\"item\":\"https://docs.userplane.io/billing/upgrading\"}]},{\"@type\":[\"Article\",\"TechArticle\"],\"@id\":\"https://docs.userplane.io/billing/upgrading#article\",\"headline\":\"Upgrading Your Plan\",\"name\":\"Upgrading Your Plan\",\"description\":\"Move to a higher plan tier for more seats, recordings, and features\",\"url\":\"https://docs.userplane.io/billing/upgrading\",\"mainEntityOfPage\":{\"@id\":\"https://docs.userplane.io/billing/upgrading#webpage\"},\"dateModified\":\"2026-03-23T22:38:53.784Z\",\"publisher\":{\"@id\":\"https://docs.userplane.io/#organization\"},\"isPartOf\":{\"@id\":\"https://docs.userplane.io#website\"}}]}\u003c/script>\u003cscript data-mint-head type=\"application/ld+json\">{\"@context\":\"https://schema.org\",\"@type\":\"WebSite\",\"name\":\"Userplane Docs\",\"creator\":{\"@type\":\"Organization\",\"name\":\"Mintlify\",\"url\":\"https://mintlify.com\"}}\u003c/script>","siteName":"Userplane Docs","nav":{"global":null,"tabs":[{"tab":"Guide","groups":[{"group":"Getting Started","icon":"rocket","pages":[{"title":"Introduction","href":"/introduction"},{"title":"Quickstart","href":"/quickstart"}]},{"group":"Setup \u0026 Onboarding","icon":"wrench","pages":[{"title":"Workspace Setup","href":"/getting-started/workspace-setup"},{"title":"Help Desk Setup","href":"/getting-started/helpdesk-setup"},{"title":"Support Agent Onboarding","href":"/getting-started/for-support-agents"},{"title":"Support Engineer Onboarding","href":"/getting-started/for-support-engineers"},{"title":"Developer Onboarding","href":"/getting-started/for-developers"}]},{"group":"Recordings","icon":"video","pages":[{"group":"Capture","pages":[{"title":"Requesting a Recording","href":"/recording/requesting"},{"title":"Reusable Recording Links","href":"/recording-links/reusable"},{"title":"Link Reference","href":"/recording/link-reference"},{"title":"Recording Domains","href":"/recording/domains"}]},{"group":"Review","pages":[{"title":"Reviewing Recordings","href":"/recording/reviewing"},{"title":"Recording Playback","href":"/recording/playback"},{"title":"Issue Analyzer","href":"/recording/issue-analyzer"},{"title":"Sharing Recordings","href":"/recording/sharing"},{"title":"Recording Expiry","href":"/recording/expiry"},{"title":"Recording Projects","href":"/recording/projects"}]},{"group":"Link Settings","pages":[{"title":"Managing Recording Links","href":"/recording-links/managing"},{"title":"Customizing Recording Links","href":"/recording-links/overview"},{"title":"Branding Your Links","href":"/recording-links/branding"},{"title":"Domain Recording Preferences","href":"/recording-links/domain-preferences"},{"title":"Recording Limits \u0026 Duration","href":"/recording-links/limits"},{"title":"Sensitive Data Redaction","href":"/recording-links/sensitive-data-redaction"},{"title":"Recording Link Metadata","href":"/recording-links/link-metadata"}]}]},{"group":"Workspace","icon":"building","pages":[{"group":"Team \u0026 Access","pages":[{"title":"Team Management","href":"/workspace/team-management"},{"title":"Roles \u0026 Permissions","href":"/workspace/roles-permissions"},{"title":"Invite Policies","href":"/workspace/invite-policies"},{"title":"Access Management","href":"/workspace/access-management"}]},{"group":"Projects","pages":[{"title":"Projects","href":"/workspace/projects"},{"title":"Project Lifecycle","href":"/workspace/project-lifecycle"}]},{"group":"Domains","pages":[{"title":"Domains","href":"/workspace/domains"},{"title":"Managing Domains","href":"/workspace/domain-management"},{"title":"Domain Verification","href":"/workspace/domain-verification"}]},{"title":"Workspace Lifecycle","href":"/workspace/workspace-lifecycle"}]},{"group":"Account","icon":"circle-user","pages":[{"title":"Updating Your Profile","href":"/account/profile"},{"title":"Notification Channels \u0026 Preferences","href":"/account/notifications"},{"title":"Connected Apps","href":"/account/connections"},{"title":"Leaving a Workspace","href":"/account/leaving-workspace"}]},{"group":"Billing","icon":"credit-card","pages":[{"title":"Subscription Overview","href":"/billing/overview"},{"title":"Trial Plans","href":"/billing/trial"},{"group":"Plans \u0026 Usage","pages":[{"title":"Understanding Usage Limits","href":"/billing/usage-limits"},{"title":"Monitoring Your Usage","description":"Track your workspace resource consumption and understand usage warnings","href":"/billing/monitoring-usage"},{"title":"Upgrading Your Plan","href":"/billing/upgrading"},{"title":"Downgrading Your Plan","description":"Move to a lower plan tier or cancel your subscription","href":"/billing/downgrading"},{"title":"Seat Add-Ons","href":"/billing/seat-add-ons"}]}]},{"group":"Support","icon":"life-ring","pages":[{"title":"Contact Us","href":"/support/contact"},{"title":"Data \u0026 Governance","href":"/support/data-governance"}]}]},{"tab":"Developer","pages":[{"title":"Developer","href":"/developer/installation"}]},{"tab":"API","pages":[{"title":"API","href":"/api/introduction"}]},{"tab":"Integrations","pages":[{"title":"Integrations","href":"/integrations/intercom"}]}]},"title":"Upgrading Your Plan - Userplane Docs","buildId":"dpl_CUnGQP1HgFUzoxatVC37y4zP83Vx","deploymentId":"dpl_CUnGQP1HgFUzoxatVC37y4zP83Vx","dynamics":["07c022d89b","a74be98ba7"],"chunks":["Frame-BCFzRGe_.js","DynamicMarkdown-BUuAYxJE.js","zoom-image-lightbox-DQ5W4Q2v.js","PlusIcon-jZ8vgk6R.js","lightbox-handle-r17bVUz3.js"]}